Checklist for Cost-Efficient Test Environments


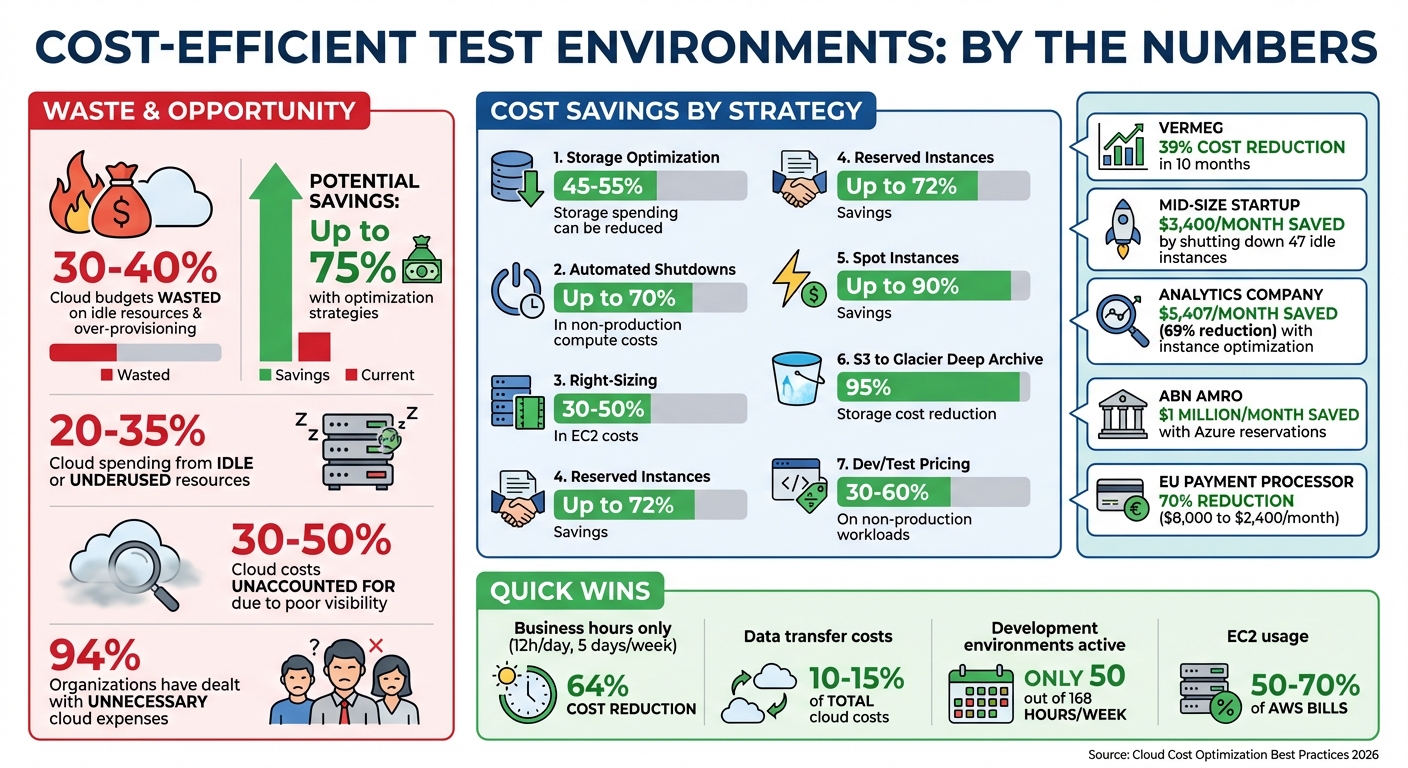
Managing cloud-based test environments can be expensive if you’re not careful. Organizations waste 30–40% of their cloud budgets on idle resources and over-provisioning. The good news? You can cut costs by up to 75% with simple strategies like automated shutdowns, right-sizing resources, and leveraging cloud provider discounts.
Here’s a quick breakdown of cost-saving tips:
- Track Spending: Use tags like
CostCenterorEnvironmentto monitor costs by team or project. - Eliminate Idle Resources: Identify unused EC2 instances, EBS volumes, and other assets with tools like AWS Trusted Advisor.
- Right-Size Resources: Match instance sizes to actual usage, and consider burstable or ARM-based instances for testing.
- Automate Shutdowns: Schedule non-production environments to run only during business hours.
- Optimize Storage: Move old test data to cheaper storage tiers like S3 Glacier.
- Use Discounts: Save up to 90% with Spot Instances or Dev/Test pricing options.
- Mock Services: Replace costly APIs or infrastructure with mock setups for testing.
- Set Budgets and Alerts: Enforce spending limits and receive alerts for unexpected charges.
Cloud Test Environment Cost Savings: Key Statistics and Strategies
How to control cloud costs without doing less
sbb-itb-7ae2cb2
Review Your Current Test Environment Spending
Understanding where your money goes is the first step in cutting unnecessary expenses. Many teams discover that 30% to 50% of their cloud costs are unaccounted for due to poor visibility. To get a handle on this, you need to implement tools that link spending directly to teams, projects, or applications.
Set Up Cost Tracking and Resource Tags
Resource tagging is your go-to method for gaining cost visibility. On platforms like AWS and GCP (where they're called labels), these tags are simple key-value pairs such as Environment: Test or Team: QA. They let you group and filter costs by specific categories like projects or owners. However, consistency is key - using both "prod" and "Production" as tags, for example, can create confusion. Establish a clear tagging framework upfront. A good starting point is requiring at least four tags for every test resource: CostCenter, Project, Owner, and Environment.
AWS users can enforce tagging standards through Tag Policies and Service Control Policies (SCPs), while GCP users can rely on Organization Policy Constraints to ensure label compliance.
"Tags are the single most important mechanism for organizing resources, tracking costs, and automating operations in AWS." - Nawaz Dhandala, Author, OneUptime
After applying tags, activate them as "Cost Allocation Tags" in AWS. Keep in mind it may take up to 24 hours for updates to show in AWS Cost Explorer or billing reports. Once enabled, tools like Cost Explorer allow you to analyze spending trends over the past year and predict future costs. GCP users can export billing data to BigQuery for detailed cost analysis using SQL queries.
For better control, set up AWS Budgets to define spending limits and receive alerts when thresholds are exceeded. To streamline reporting, use AWS Lambda and SNS to send weekly cost summaries to stakeholders via email or Slack. Integrating these with a QA metrics analyzer can provide deeper insights into how testing activity correlates with cloud consumption. AWS Cost Anomaly Detection can also notify you of unexpected spending surges.
Once you’ve mapped out your expenses, the next step is identifying and removing idle resources that quietly drain your budget. This process is a key part of analyzing QA risks associated with infrastructure overspending.
Find and Remove Idle Resources
With a clear view of your spending, it’s time to tackle idle resources. These are often test-related assets that were left running and forgotten. Common examples include:
- Idle EC2 instances
- Unattached EBS volumes
- Unassociated Elastic IPs
- Inactive load balancers
- Underused NAT gateways
AWS Trusted Advisor can help you pinpoint these underutilized resources. For instance, you could identify EC2 instances with less than 5% CPU usage and minimal network activity over a two-week period as candidates for termination. VERMEG, a fintech company, cut its on-demand AWS costs by over 39% in just ten months by addressing idle and oversized instances.
The costs of idle resources can add up fast. For example:
- Unassociated Elastic IPs cost about $0.005 per hour (roughly $3.60 per month).
- Load balancers can cost $16 to $22 per month even with no traffic.
- NAT gateways typically cost $32 per month per gateway, plus $0.045 per GB of data processed.
A mid-size startup saved $3,400 per month simply by shutting down 47 idle EC2 instances with an average CPU usage of 0.2%.
Before deleting any resource, use the "scream test" approach: stop the resource temporarily instead of deleting it outright. If no one reports a problem within 14 to 30 days, it’s likely safe to terminate it. Always take a final snapshot before deleting unattached EBS volumes to ensure you can recover data if needed. For added efficiency, use AWS Data Lifecycle Manager (DLM) to automate the cleanup of old EBS snapshots based on a retention policy, such as 30 days.
Match Resources to Testing Needs
Once you've cut out idle resources, it's time to align your active assets with your structured test plan to further trim costs. Since EC2 usage often makes up 50% to 70% of AWS bills, even minor tweaks can lead to noticeable savings. The next step? Optimizing your instance configurations to fit your actual workload. This ensures your infrastructure supports every detailed test case without overspending.
Choose the Right Instance Sizes
Test environments are notorious for being overprovisioned. Teams often select instance sizes based on worst-case scenarios and rarely revisit these decisions, which means you're likely paying for unused capacity.
Start by monitoring CPU and memory usage over a four-week period. If usage consistently stays below 40%, it's time to downsize. For example, switching from a c4.8xlarge to a c4.4xlarge can slash costs by half without affecting performance.
For test environments, burstable instances like T3 or T4g are a smart choice. These instances build up CPU credits during idle times and spend them during activity spikes - perfect for the irregular nature of testing. A t3.medium runs about $30 per month, compared to $70 for an m5.large. Keep an eye on the CPUCreditBalance metric in CloudWatch; if it frequently hits zero, you might need to upgrade to a fixed-performance M-series instance or enable T3 Unlimited.
Here's a real-world example: In early 2026, an analytics company shifted from x1e.2xlarge instances to x2iedn.xlarge for SQL Server testing. Despite the smaller instance size, the x2 generation's improvements allowed them to downgrade from Enterprise to Standard SQL Server edition, cutting vCPU licensing from 8 to 4. This change saved them $5,407 per month - a 69% reduction in costs.
If your stack supports Linux and modern languages like Node.js, Python, or Go, consider Graviton-based (ARM) instances. These offer up to 20% lower costs and better performance compared to Intel-based instances. With proper right-sizing based on actual usage data, you can reduce EC2 costs by 30% to 50%.
Once you've optimized instance sizes, the next step is automating scaling to adapt to fluctuating workloads.
Configure Auto-Scaling Policies
Auto-scaling helps ensure you're only paying for resources when you need them. Set up an Auto Scaling Group (ASG) with defined parameters: a minimum (floor), maximum (ceiling), and desired capacity. This keeps resource spending under control. For most testing scenarios, target tracking works well. For instance, setting a target CPU utilization of 60% allows AWS to adjust capacity automatically as demand changes.
To avoid rapid instance turnover, use asymmetric cooldowns: a short ScaleOutCooldown (about 60 seconds) and a longer ScaleInCooldown (300+ seconds). Enable detailed CloudWatch monitoring with one-minute intervals so scaling policies can respond quickly to demand shifts.
For predictable workloads, scheduled scaling is a game-changer. For example, if your team works from 9:00 AM to 5:00 PM, you can schedule resources to scale up at the start of the day and scale down after work ends. This approach can save up to 65% of costs for a 10-hour weekday schedule. When combined with right-sizing, Spot instances, and scheduling, you could see overall savings of up to 95%.
Lower Storage and Data Transfer Costs
After optimizing compute expenses, turning attention to storage and data transfer can unlock even more savings in test environments. It's estimated that 45% to 55% of cloud storage spending can be trimmed down, with data egress alone contributing 10% to 15% of total cloud costs. Much of this waste comes from idle test data and inefficient routing, which are relatively simple to address.
Use Lower-Cost Storage for Old Test Data
Test environments tend to generate mountains of data - logs, snapshots, and artifacts - that often go untouched after the first 30 days. Studies show that 60% to 80% of stored data sees little to no access beyond this point, yet it continues to incur charges at higher storage rates.
After using a test case prioritization tool to identify critical testing paths, To tackle this, start by categorizing your data into tiers: Hot (frequently accessed), Warm (occasionally accessed), Cold (rarely accessed), and Archive (long-term storage or compliance). Tools like S3 Storage Lens can help you identify what’s actively being used versus what’s just sitting idle, such as noncurrent object versions or incomplete multipart uploads. These unused versions alone can make up 30% to 40% of your total S3 usage if left unchecked.
Once you’ve sorted your data, implement S3 Lifecycle Policies to automatically move objects to cheaper storage classes. For example, transferring data from S3 Standard to Glacier Deep Archive can slash storage costs by 95%, while moving to S3 Standard-IA (Infrequent Access) saves 46% compared to Standard storage. If your test environment has unpredictable access patterns, consider S3 Intelligent-Tiering, which adjusts data placement automatically without retrieval fees. AWS customers have reportedly saved over $6 billion using this feature.
Don’t forget to audit for unused resources like unattached EBS volumes or incomplete multipart uploads, which can silently drain hundreds of dollars each month. Set lifecycle rules to delete incomplete uploads after 7 days, and regularly clean up old snapshots or unattached volumes. Switching to EBS Snapshot Archive for older snapshots can cut costs by around 75% compared to regular snapshot storage.
However, keep an eye on object size when moving data to lower-cost tiers - objects smaller than 128 KB are billed at a minimum of 128 KB in IA or Glacier tiers, which could actually increase costs. Compressing text-heavy data like logs, JSON, and CSV files before uploading can reduce both storage and transfer volumes by 80% to 90%.
Finally, make sure your compute and storage resources are co-located to avoid unnecessary data transfer charges.
Keep Compute and Data in the Same Region
Consolidating compute and storage resources within the same region or Availability Zone (AZ) can eliminate costly cross-region fees and reduce intra-AZ transfer costs. Cross-region transfers typically cost $0.02 per GB, while transfers between AZs within the same region cost $0.01 per GB in each direction. Transfers within the same AZ using private IP addresses, however, are completely free.
"The general rule of thumb in AWS is: Data IN is free, Data OUT costs money."
For test environments, place all components - compute, cache, and databases - within a single AZ to eliminate internal data transfer charges. Use Gateway VPC Endpoints for services like S3 and DynamoDB to avoid NAT Gateway processing fees, which cost $0.045 per GB. For instance, transferring 10TB of data through a NAT Gateway could rack up $450 in processing fees alone, not counting standard egress charges.
When configuring resources, rely on AZ IDs (e.g., use1-az1) instead of AZ names (e.g., us-east-1a), as AZ names vary across accounts and may not correspond to the same physical infrastructure. Enable VPC Flow Logs and use tools like Cost Explorer (filtered by "Usage Type") to pinpoint regions or instances responsible for high data transfer costs. Compressing large datasets, logs, or API payloads before transferring them across regions or AZs can also significantly reduce costs.
Automate Environment Cleanup and Scheduling
Optimizing resources is great, but automating environment cleanup takes cost-cutting to the next level. Test environments often run continuously, racking up unnecessary expenses. Research shows that 20% to 35% of cloud spending comes from idle or underused resources, while development environments are typically active for only about 50 out of 168 hours a week. Automating shutdowns and creating temporary environments can help align resource usage with actual testing needs.
Schedule Automatic Shutdowns
Non-production environments often stay on after work hours, needlessly increasing costs. By scheduling automatic shutdowns, businesses can slash non-production compute expenses by up to 70%. For example, running resources only during business hours (12 hours a day, 5 days a week) reduces usage to just 36% of the week, cutting costs by 64% compared to round-the-clock operation.
Start by tagging resources with identifiers like AutoShutdown: true or Schedule: office-hours to flag instances for automation. Tools like AWS Instance Scheduler, Azure's VM shutdown schedules, and GCP Instance Schedules make it easy to automate start/stop cycles for test environments. For more complex needs - like managing resources across regions or coordinating multiple services - custom scripts using Lambda or Cloud Functions can check for active connections or usage before shutting down.
This strategy isn't limited to compute instances. Apply it to RDS databases, Aurora clusters, Auto Scaling Groups, and ECS services by scaling them down to zero during off-hours. For containerized workloads, set automation to reduce the desired count to zero instead of stopping individual instances. Some universities have reported cutting EC2 costs by over 30% in just one month with automated shutdowns.
You can also use CloudWatch alarms to monitor inactivity - like CPU utilization dropping below 3% for an hour - and trigger shutdowns. To avoid surprises, set up SNS notifications to alert resource owners 30 minutes before a scheduled shutdown. For last-minute tasks, include an override option with a "KeepRunning" tag that expires after a set time. For example, a GCP e2-standard-4 instance in us-central1 costs around $97 per month when running 24/7. Limiting use to weekday business hours (8 AM to 7 PM) drops the cost to about $32 - saving 67%.
Beyond scheduling, temporary environments ensure you're only paying for resources when they're actually needed.
Create Temporary Environments with Infrastructure as Code
Temporary environments are perfect for short-term tasks like demos or load tests. They eliminate waste by existing only as long as they're needed. Tools like Terraform workspaces let teams maintain separate state files for identical configurations, making it easy to spin up and tear down environments. Integrating this into your CI/CD pipeline allows terraform apply to create environments when a pull request is opened and terraform destroy to remove them once it's closed.
Tag resources with a "Time to Live" (TTL) or "DestroyAt" timestamp, and use scripts or Lambda functions to clean up resources past their expiration date. Prefix temporary workspaces (e.g., temp-, demo-, pr-) for easier management. Use conditional logic in your Infrastructure as Code (IaC) to adjust configurations for temporary environments - like using smaller instance types, skipping database backups, or disabling multi-AZ deployments - to save even more.
For noncritical workloads, configure IaC to use AWS Spot Instances or Fargate Spot for lower costs compared to on-demand pricing. Enforce tagging policies with AWS Config or Service Control Policies to require cost-related tags (e.g., Environment, Owner, Project) when creating resources, ensuring everything is trackable. Add a "dry-run" mode and notification period (e.g., 7 days) to prevent accidental data loss during cleanup.
Use Cloud Provider Discounts and Pricing Options
Once you've automated cleanup and scheduling, the next step is to tap into cloud provider pricing models to cut costs even further. These models can make a big difference, especially for test environments. For example, Reserved Instances can slash costs by up to 72% when you commit to specific resources for one or three years. On the other hand, Spot Instances offer savings of up to 90% by utilizing unused cloud capacity. However, they come with a catch - they can be interrupted with as little as 30 seconds to 2 minutes of notice. For test environments with predictable usage, these options can deliver major savings.
Apply Reserved or Spot Instances
Reserved Instances are ideal for always-on test environments. If you’re running integration servers or databases 24/7, committing to a one-year or three-year term can result in significant discounts. AWS Savings Plans provide similar benefits with added flexibility. For instance, Compute Savings Plans and Instance Savings Plans allow you to save up to 66% and 72%, respectively, by committing to a consistent hourly spend rather than locking into specific instance types.
Meanwhile, Spot Instances work best for non-critical, interruptible workloads like CI/CD pipelines or batch testing. To ensure coverage during these runs, teams can use a test scenario generator to quickly define edge cases. AWS reports that Spot Instances are interrupted less than 5% of the time on average. To minimize interruptions, you can specify 10 or more instance types across multiple availability zones, which can cut interruption rates by 50–80%. A smart approach is to combine a small baseline of on-demand or reserved instances for core services with Spot Instances to handle scaling needs for test execution.
"The key to success is treating interruptions as expected events rather than failures - design your architecture around them, and spot instances become a powerful cost optimization tool."
– Nawaz Dhandala, OneUptime
A real-world example of this strategy comes from Hans De Kruif, Platform Engineer and Azure Cost Manager at ABN AMRO. In June 2025, the organization reported saving over $1 million per month on Azure costs by strategically using Azure reservations for their virtual machine infrastructure.
Access Dev/Test Pricing Programs
To build on these savings, consider specialized Dev/Test pricing options that are tailored for non-production workloads. For instance, Azure's Dev/Test pricing eliminates Microsoft software licensing fees, allowing Windows VMs to be billed at Linux rates and cutting SQL Database costs by up to 55%. A typical web app environment running SQL Database and App Service can achieve savings of up to 57%, while Logic Apps Enterprise Connectors are discounted by 50%.
To access these discounts, you'll need to create dedicated subscriptions specifically for development and testing. Most Dev/Test plans also require active Visual Studio subscriptions for all users managing the resources. Depending on your setup, you can choose between Pay-As-You-Go Dev/Test for smaller teams without an Enterprise Agreement, Enterprise Dev/Test for organizations with an EA, or the Azure Plan for Dev/Test under a Microsoft Customer Agreement.
Organizations typically save 30–60% on non-production workloads with Dev/Test pricing. For example, a D4s v3 Windows VM that costs around $350 per month at standard rates drops to roughly $175 per month under Dev/Test pricing. For predictable, long-term testing needs, you can combine these discounts with Azure Reservations to maximize your savings. Just make sure to reserve these rates exclusively for non-production use to maintain eligibility for the discounts.
Replace Expensive Resources with Mock Services
After exploring pricing strategies and discounts, another effective way to cut costs is by substituting expensive resources with mock services. This method allows you to maintain full test coverage without the hefty expenses of third-party API calls or high-performance infrastructure during development. In fact, using mock versions of external dependencies can slash development environment costs by nearly 50%.
Mocking also eliminates reliance on the availability of external services, ensuring your tests remain stable even during third-party outages. It allows teams to work in parallel without waiting for live services and makes it easier to simulate tricky scenarios, like outages or error responses.
As Nawaz Dhandala from OneUptime puts it, "Mock providers solve this by replacing real cloud APIs with simulated responses. Your tests run in seconds, need no credentials, and cost nothing".
Set Up API Mocking
Start by identifying pay-per-request services - like email delivery, push notifications, and payment gateways - as ideal candidates for mocking. For instance, Amazon API Gateway offers a free tier covering the first 1 million requests per month, making it a budget-friendly choice for mock integrations.
To get the best results, use OpenAPI specifications to generate mock server stubs automatically. This minimizes human error and ensures high accuracy. Additionally, configure mocks to simulate common HTTP status codes (such as 404, 500, or 503) and introduce network latency to test your application's resilience. Store mock definitions in version control and integrate them into your CI/CD pipeline to keep them updated and consistent.
Emulate GPUs for Non-Critical Workloads
For tasks that don't require high-performance hardware, consider emulating GPUs to sidestep the expense of dedicated GPU instances. Virtualized compute primitives can help validate application logic and resource allocation before investing in costly hardware.
LocalStack, a widely-used AWS cloud emulator, has surpassed 300 million Docker pulls, highlighting the rising popularity of local cloud emulation. This technique is particularly valuable for configuration testing, ensuring your software correctly detects and requests hardware resources without needing a physical GPU.
Create Cost Controls and Spending Limits
Once you've fine-tuned your resources and pricing, the next step is to lock in those savings by implementing automated controls. Without proper guardrails, costs - especially in test environments - can quickly spiral out of control. In fact, 94% of organizations have dealt with unnecessary cloud expenses.
"Cost governance isn't about being cheap. It's about spending intentionally - knowing where every dollar goes and making sure it's delivering value".
– Nawaz Dhandala, OneUptime
Require Resource Tags and Set Budget Alerts
Unallocated spending can account for 30%–50% of cloud costs. Enforcing mandatory resource tags ensures every dollar is accounted for. Tools like Terraform’s default_tags block can help by automatically applying tags to resources as they’re created.
To make this work across your organization, use Service Control Policies or Azure Policy to enforce tagging requirements. Then, activate these tags as "Cost Allocation Tags" in your billing console. Keep in mind that it may take up to 24 hours for these tags to appear in your cost reports.
Set budgets at multiple levels:
- An overall account budget
- Service-specific budgets for high-cost areas like EC2 or RDS
- Tag-based budgets for individual teams
For better monitoring, configure alerts at 50%, 80%, and 100% of your budget thresholds. Instead of relying on email, route these alerts to Slack or Microsoft Teams. These platforms make alerts harder to miss and allow for quicker team responses.
Once tagging and budget alerts are in place, you can take it a step further by setting hard resource limits.
Set Resource Allocation Limits
Budget alerts are great, but they work even better when paired with technical controls that prevent unauthorized spending. For example, use Service Control Policies to block the launch of high-cost instance types like *.metal or *.24xlarge, which are rarely necessary for test environments.
You can also implement "hard" limits that stop new resource launches once a budget is exceeded. Importantly, these limits allow currently running resources to continue, avoiding immediate workflow disruptions. This is especially important when using a test case template to maintain testing velocity.
To stay ahead of potential overruns, set up forecasted budget alerts. These alerts notify teams when spending is projected to exceed limits, giving them time to adjust before hitting the cap. Additionally, tag-based IAM policies can restrict which teams have control over certain resources, ensuring tighter cost management.
Conclusion
This checklist has provided step-by-step methods to balance cost efficiency with quality assurance in test environments. Reducing testing expenses doesn’t mean cutting corners - it’s about making smarter decisions. Start small with quick wins like turning off unused resources and automating shutdowns. Then, move on to more strategic approaches, such as rightsizing and using reserved instances, to achieve deeper savings over time. These incremental steps highlight the value of consistent, thoughtful adjustments.
"The first step towards justifying automation initiatives and investing in cloud-based test environment infrastructure is to measure the effort required in test environment management." – Andrew Walker, Software Architect, Enov8
Maintaining high-quality testing where it matters most is essential. For example, keep staging environments as close to production as possible if they’re your final testing layer. Meanwhile, apply more aggressive cost-saving measures to less critical development and testing environments. A real-world case from June 2023 illustrates this well: an EU-based payment processor slashed monthly cloud costs from $8,000 to $2,400 - a 70% reduction - by containerizing 12 microservices and adopting ephemeral environments. This not only saved money but also decreased environment-related bugs by 89%. It’s clear that efficient environments can enhance both cost savings and performance.
Optimization in the cloud is a continuous process. As workloads evolve and teams grow, new pricing models and technologies will emerge. Regularly review your environments - monthly is ideal - and explore innovations like AWS Graviton processors, which deliver up to 40% better price-performance compared to x86-based instances.
Finally, consider integrated solutions like Ranger to identify bugs faster while keeping costs under control.
FAQs
Which cost tags should every test resource have?
Every test resource should have cost tags such as Department, Project, Environment, and Owner. These tags play a key role in tracking expenses, assigning responsibility, and managing resources efficiently.
How do I safely find and delete idle cloud resources?
To manage idle cloud resources safely, start by identifying items that are no longer in use, such as unattached volumes, idle instances, outdated load balancers, and orphaned snapshots. For AWS users, it's a good idea to routinely check for idle EC2 instances and unattached EBS volumes. Before removing anything, double-check that the resources are no longer required. If there's any valuable data, consider creating snapshots to avoid losing it. Regularly monitoring your resources not only cuts down on unnecessary expenses but also helps maintain an efficient cloud environment.
When should I use Spot vs Reserved pricing for tests?
For tests that can tolerate interruptions and are flexible, Spot pricing is a smart choice. It can save you up to 90% compared to on-demand pricing, making it perfect for non-critical and scalable testing scenarios. On the other hand, if your tests demand a stable and predictable setup - like regression testing or critical integration testing - Reserved pricing is the better option. It ensures consistent environments and guaranteed capacity, which are key for reliability.
Related Blog Posts
Stop babysitting your coding agents. Use Ranger
More signals, less noise, faster launches
Let Ranger be your guide to sustainable QA testing.

.png)